Pages

24 March 2011

Gear Review: Aimpoint PRO ( Patrol Rifle Optics )

OVERVIEW:
     As mentioned in my previous blogs, I have been in the market for a scope to mount atop my AR15. The first scope tested was the KonusPro M30 1.5-6x44mm by Konus Optics, however, it was rejected due to inconsistent adjustments and failure to return to zero after large adjustments.  I then tested the Vortex PST 1-4x24mm with the MRAD mil scale/mil adjustments.  I didn't field test this scope because I didn't feel the need to.  The MRAD mil scale was so fine that I had a hard time in quickly picking up the reticles without the illumination being on.  Since this rifle is primarily being used for quick shooting from 25 to 300 meters, I wanted a sight that I could quickly engage targets with (under 3 seconds or so).


THE AIMPOINTS:
     I went back to the shop where I had purchased the Vortex from and was in the process of returning the scope when I saw the Aimpoints.  I decided I had nothing to lose by picking it up and giving it a look, so I did.  Then I remembered how when I was in the military, we used the Aimpoints (M68) with good effect out to 300m.  I picked it up and turned it on.  Just as I remembered it... not bad.  I vaguely remembered someone on the internet complaining about how the red dot was difficult to see in bright sunlight, so I took the scope outside and found no problems picking out targets, even targets reflecting brightly in the sun.  I returned back inside, whipped out the iPhone and researched the particular model I was holding (the Aimpoint PRO - Patrol Rifle Optics) vs. a EOTech EXPS3-2 and this is what I found out:

Aimpoint PRO                                                                    EOTech EXPS3-2


•  30,000 hour battery life (over three years of continuous use at output level of 7) vs EOTech's 600hrs
•  waterproof down to 150' vs EOTech's 33'
•  1-2MOA dot vs EOTech's 2-1MOA dots surrounded by a 65MOA ring
•  built-in lens covers vs no lens covers on the EOTech


     Both are excellent sight and offer features the other doesn't have.  For example, they both have extremely rugged designs and both come with mounts.  They both co-witness to iron sights and both have proven themselves in combat and in law enforcement.  However, the above mentioned features are what sold me on the Aimpoint PRO.  I made the purchase.

My new Aimpoint PRO Patrol Rifle Optics


     Once I got home, I mounted the Aimpoint onto my AR15.  I positioned the sight so that it provided good eye relief and tightened the mount onto the picatinny rail.  Per the instructions, I turned the mounting screw until I heard three (3) clicks from the self-torquing screw.  Perfect, a nice solid mount. 


Aimpoint mounted on my AR15

Front 3/4 view of the sight

This is the self-torquing screw.  Turn it until it clicks three (3) times and you're done.

Front view.  There is a clear sticker on the front lens cap that has the in-service date on it.  Hard to see in the picture but it's there.

Right side view of the Aimpoint PRO.  There is a plastic piece that hold the elevation and windage caps in place during zeroring.  On this model, the ON/OFF switch is the same as the miitary's M68.

Top view.  Yes, I've already scuffed the top of the ON/OFF switch.

Rear view.  Note the clear rear lens cap.  This allows the red dot to be used in a pinch without either the front or rear lens cap flipped up.  With both eyes open, you just superimpose the red dot over the target and squeeze.

Front view (again), but I really liked how the rail was reflected on the front lens element.

This picture was taken on a bright sunny day at the highest intensity setting.  The flaring around the upper edge of the scope was somehow exaggerated by the camera.  When viewing with one naked eye, the flaring wasn't nearly as visible.  When viewed with both eyes open (as intended), the flaring cannot be seen.

This is the setting (intensity level 7) that will get you 30,000 hours of continuous use.  As you can see in the picture, even at level 7 you can still pick out the red dot on a sunny day.  


     The red dot CAN clearly be seen in direct sunlight against a white surface, but the limitations of my camera was unable to capture the red dot against a white background so I did not include a picture.  Finished for now.  I will put up an update once I get a chance to take it out to the desert to zero the sights.

20 March 2011

Bug Out Bag (B.O.B.) for your Vehicle, Packing List

     Living in Southern California, we all have our suspicions that the "big one" may hit someday.  It could be in the form of an earthquake or as I recently became aware of,  in the form of a 500 year rain storm that could potentially drop 10 ft of rain over a period of approximately 30 days.   Meteorologist say that having a major rain storm is as probable as having a major earthquake.  So what can I do?  Well, nothing to change the weather, but you can prepare as best you can to make the ride a little easier.


     Since the big earthquake last week in Japan (11Mar2011), thousands of people have become aware of the need to prepare for a major natural disaster.   Infact, the local surplus stores are just going crazy with the amount of traffic they have been getting.  I saw one gentleman walk out of the store, pushing a flat cart filled with 10 cases of MRE's!  WOW, talk about  feeling the pressure!  Either way, I think he did the right thing preparing for the worst.  Having a large supply of survival goods at home is an excellent, potentially life-saving idea.  But what happens if you're not at home?  What if, like the vast majority of us, you are at work when the "big one" hits?  I suppose if you live only a few miles away, it's not a big deal:  just walk it.  However, if you're like me and the majority of the population in Southern California, you commute more than 40 miles to work each day.  That's 20 miles you have to hump if the "big one" hits while you are at work.  Are you prepared for a walk of that distance?  Maybe, maybe not.  You may be thinking, "wait I commute twenty miles, I'm screwed!"  Don't feel bad, I commute 37 miles each way to work (the laughs on me, so go ahead).  But you know what?  I'm prepared for such a scenario and hopefully after reading this blog, you can get an idea of what to pack and how to plan in case you find yourself in a similar situation.
 

************************************************************************************************************


VEHICLE BUGOUT PACK ( download packing list here - pdf )


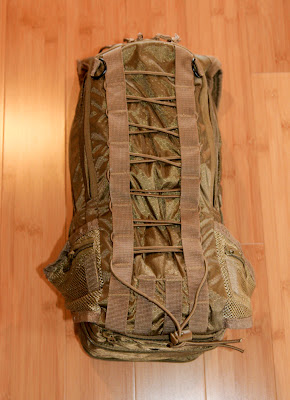
Pack type:  Voodoo MSP-4 Enhanced Hydration Pack

All the items below layed out.

NAVIGATION:
1 EA, 1:24K map of possible E&E departure points in waterproof bags
1 EA, GPS with spare batteries
1 EA, headlamp (preferred) or flashlight


SIGNAL/COMMUNICATION:
1 EA, cell phone
4 EA, chem-lite


PERSONAL DEFENSE:
1 EA, pepper spray
1 EA, folding knife


SHELTER:
1 EA, emergency blanket


FOOD/WATER:
8 EA, bottled water (used to fill hydration pack)
4 EA, individual sized electrolyte mix (ie, Gatorade or Cytomax)
4 EA, bottled water (packed)
8 EA, energy gel packs
•  emergency food to provide enough calories to get you home


CLOTHING:
1 PR, running shoes
1 PR, running pants
1 EA, running shorts
1 EA, moisture wicking t-shirt
1 EA, thin sweater
1 PR, socks
1 EA, hat
1 PR, thin work gloves


PERSONAL HYGEINE/FIRST AID:
1 EA, package of bath wipes
1 EA, roll of Krylex
4 EA, alcohol prep pads
2 EA, 4x4 sterile gauze
3 EA, large bandaids
1 EA, 7x8 dressing
1 EA, cravat or bandana
1 EA, roll of medical adhesive tape

************************************************************************************************************


The PLAN:


1)  Separate all items into categories (ie, First-Aid, Clothing, Food, etc).  Place all items into water tight plastic bags.


*   I used Ziploc type plastic bags and Food Saver bags to waterproof and organize my gear.


2)  Place all items into the hydration pack.  Be sure to pack critical items in easy to reach locations.


*   My Navigation, Signal/Communication, and Personal Defense items are stored in the easy access outer compartments.

The elastic cord that zig-zags across the front of it can be used to secure your jacket when you don't need it.

The two pictures above are of my Vehicle Bugout Pack loaded, minus the water and shoes.  Notice the small mesh pockets (half unzipped) to the right of the picture.  There is one on each side of the waist band and this is a perfect place to stow your keys, spare change, etc.

3)  When the time comes to bugout, fill your hydration pack bladder with the bottled water.  Store as much of the remaining bottled water into your pack.


*   I keep a case of bottled water in my car for the purpose of filling my hydration pack bladder. I chose bottled water over containers of pre-made "emergency water" because of the cost and simplicity of rotating stock.


4)  Put on your running clothes and shoes.


*   I chose to pack running clothes in my bugout kit for one reason only.  I plan on getting back to my family as fast as possible, which means keeping things light for my run home.


5)  Place your pre-written E&E note in a visible area AND tell a co-worker/friend (if available) where you're going.


*   My E&E note has a strip of double sided tape on the back so that I can easily stick it on a wall or something.


6)  Move out with a purpose and don't let anything or anyone stop you.  Get home to your loved ones.

Notice the zippered pocket on top running horizontally.

That zippered pocket contains a mesh flap that can be used to secure larger items to the hydration pack.

For demonstration purposes, I've secured my running shoes in case I want to run barefeet (more on this in a future blog).

Side view of the outer flap enclosure.  It's a very cool feature that I really like about the MSP-4 hydration pack.


*   Be mentally ready.  You may see disturbing things on your way back home.  People will notice that you have prepared.  Don't let them stop you or take your gear.  Keep this in mind:  if you don't know the condition of your family or loved ones, they may be in need of your help, too!
          _______________________________________________________
Note:  The hydration pack, at a minimum, should be large enough to fit all the items except the bottled water, clothes, and shoes.  If everything fits, even better, as long as the hydration pack has compression straps.


*   My running shoes, spare bottled water supply (except the four bottles), and Vehicle Bugout Pack are kept together in a duffel bag in my car.  The running shoes and spare bottled water aren’t kept in my hydration pack so that I can save space which allow me to have a smaller, lighter hydration pack.

Earthquake Prediction on Fox news

NEWS FLASH!!!

18March2011: Friday night Fox news interviewed a former USGS geologist Jim Burkland who stated the following:


Based on facts and recent natural events, Burkland feels the "big one" is eminent. According to Burkland, the earthquake will hit the west coast of the United States sometime between 19March2011 and 26March2011. That's NOW folks. Hopefully he's wrong because although we may be prepared, nobody really wants it to happen.  Burkland also mentions the Pacific Ring of Fire. Based on the sequence of recent earthquake events around the Pacific Rim, Burkland believes we are next. Here's a link to his Fox news interview:

The Pacific Ring of Fire


http://www.youtube.com/watch?v=xQXDt4VdS0E&feature=youtube_gdata_player

*NOTE: Jim Burkland is the guy that predicted the San Francisco earthquake four days before it happened.

Remember the millions of sardines that washed up in Redondo Beach last week? Well, the same thing happened in Japan just two days before their 11March earthquake. Also last week in New Zealand approximately 173 whales washed up dead, all on the same stretch of beach. Now we have a pod of whales off the coast of San Diego that has no business in the Southern California region. Why am I saying all this? Biologists say that certain animals (like marine life), navigate along their migratory route via magnetic fields. Before a major seismic activity, the magnetic fields go out of whack and the animals' navigation is thrown off, resulting in animals being where they aren't supposed to be.

The millions of dead sardines that washed up ashore in Redondo Beach, CA

So what now? I say just make sure you have your business in order. If you haven't done any sort of preparation, don't worry, it's not too late. Just simply grabbing a backpack or duffel and packing some basic items (clothes, bottled water, toiletry, etc) will get you on your way. Of course, you can prep further as you have more time, but something is always better than nothing. Look at the devastation in Japan. They get one of every five earthquakes in the world so they are no strangers to natural disasters. Yet it's been over a week and many still aren't provided decent shelters, warmth or food. Alittle preparation now will go a long way. Take time now and do yourself a favor.

I put this blog up just as a heads up for folks who may be concerned. Please don't panic as it's just the opinion of one person. Nobody really knows when the "big one" will hit. As for me, any warning, even if it is false, is helpful and appreciated.
"Be Prepared."

18 March 2011

Gear Review: Vortex Viper PST 1-4x24mm rifle scope by Vortex Optics

Overview:  So it's been a few weeks since I tested the KonusPro 1.5-6x44mm scope and in that time, I hit the internet again in search for the ideal scope for my needs.  I just want a scope that has illuminated reticles, some sort of ranging capabilities, and variable power starting at 1X.   Well, the searching paid off because I came across a very well built scope.  The VORTEX VIPER PST 1-4X24MM scope.


First a little about the scope.  It has all the features I'm looking for plus the added benefit of being shock and waterproof.  Nitrogen purged, fully coated optics, a neat ranging scale reticle, and backed by what I've heard to be excellent customer service (hopefully I will never have to use it).

I picked up a set of these Leupold quick release rings along with the scope.  I know, some of you guru's are saying, that's not going to work.  Well, you're right, but more on that later.

The box.  Picked it up at a local store for $499.99.  A fair price.

Left side of the label shows the PST reticle.

The scope comes with (1) owner's manual, (1) MRAD user guide, (1) cleaning cloth, and (1) accessory pack containing a battery, brass shims, and allen key.
View as seen from the front.
It appears that Vortex now ships this scope with a bikini style lens cover.  I personally do not like this.  On a scope that costs $500, you would think they would throw in some nice flip-ups.

I'm not a machinist, but from what I can see, the machining is nice.  Notice the adjustments are in mils and clearly indicated on the turret heads.  I noticed that the windage dials do not have the red fiber optic indicator as the elevation dial does.
Elevation and windage dials DO move up and down as the scope is adjusted and is clearly marked, making it easy to see.  The MILLET DMS-1 does not have this feature which I like.  The elevation turret does have a red fiber optic indicator.  I suppose this is to help you get back to center.  Personally, I don't see this to be a critical feature. 

Left side of the elevation turret.
Right side view of the eye piece.  Notice the nice knurling on the magnification dial, which turns very nicely.  Not to easily, but consistently with a good amount of resistance. 
The illumination dial is variable from 1-10.  Intensity settings 1-4 must be for NVD's as it is not visible with the naked eye.  From 5 on, the four (4) quadrants of the reticle lights up nicely.  The dots between the numbers are off positions. 

Again, nice machining or casting on the power setting.  Various points of the magnification are marked by raised tabs on the magnification dial.
The label that has so many folks disturbed.  Yes, the scope clearly states "Made in Philippines." From what I see so far, the quality of the build (from what I tell without shooting it) is on par with my Leupold.   The turrets feels different on the Vortex than on my Leupold. Less of a click, but very positive still, on the Vortex (my Leupold is about twenty years old and still holding strong).
As for the reticle, it's alittle hard to see.  I have read elsewhere that if you have good vision it shouldn't be a problem.  Well, for me, the problem isn't that I can't see the reticle because I can.  I just find it extremely hard to read the scale because it's so fine!   The reticle is so fine that you can easily reference targets out to 800m or so, but you can forget about quick range estimation.  I prefer the mil-dots.


I have also read somewhere that the illuminated reticle is not visible in bright day light.  Could be true on a bright sunny day in the desert, but as you can see in the pictures below, it is visible (and very usable).

The reticle without illumination at approximately 10 meters.  The super fine scale is what I was referring to earlier (the backdrop in this picture is my DIY archery target).

The reticle with illumination turned on.  The scope is facing into the sun, pointed at the shaded side of a bush, approximately 8 meters away.

Pointing at a small palm tree in full sun.  As you can see, the reticle is clearly visible even against a reddish background.  Also, notice how bright the optics are.  There is really no discernible difference (in terms of darkening) between what you see with the naked eye vs what you see through the scope.  Great optical quality.


Conclusion:  I've had the scope for two days now and after milling things out around my neighborhood, I decided not to keep it.  The reticle was just too fine for my liking.  Even at 1x magnification, I found it slightly difficult to quickly get on target.  For me, if the reticle was just a hair thicker, this scope would definitely have been the clear winner.


RE scope mounts:  Well, the mount does allow the scope to be fitted onto the AR nicely, however, I have the MagPul flip up rear sights and with this particular mount, the scope sits too low.  Infact, about 15% of the view through the scope is blacked out. 


Gear Review: KonusPro M30 1.5-6x44 rifle scope by Konus

One of the last steps in completing my bugout rifle is to top it off with some sort of close to medium range sights.  My two basic choices were either an electronic red dot type sight or a variable power optic sight.  After much thought, I decided on getting traditional optics with variable power.  Basically, I wanted a scope that could be used for close quarters, but have some magnification to aid in target identification at longer ranges.

     After much internet research, I decided the next step was to check out Scope City, a local optics vendor.  Mike at Scope City was very helpful.  He showed me several of the scopes he carried, mainly the Konus scopes.  Up until I had spoken to Mike, I had never heard of Konus so I was alittle skeptical about its quality.  Then the unexpected happened.  Mike offered to let me "try out" the scope.  Yes, you read correctly.  He let me take the scope home, mount it, take it out to the desert and test it out 'til my heart was content.  Great, I thought...  I'll try the KonusPro M30 1.5-6x44.  He even threw in the mounts.  Thanks Mike!

What's in the box:  
•  scope
•  lens tissue
•  flip up lens caps (not the best)
•  allen keys for the turrets
•  warranty card

Here are some closeups of the KonusPro M30:

KonusPro M30 on the Konus mounts.

I really like the 1/2 minute elevation and windage on a scope covering this range.  One of the features I really like about this scope is that when you change the elevation or windage, the stadia lines on the dial moves up and down.  Although this would seem normal, the MILLET DMS-1 scopes does not move up or down.  It just spins in place, making it really hard to know how far from zero you are after radical changes.

The illumination controls, located on the left side of the scope, offers both RED and BLUE dots with an intensity range of 1-6.  See below for intensity variations.

30mm main tube with brand and model nicely printed on the front end.

The power setting indicator is just a small white dot, although this doesn't seem like a deal-breaker for me.  The dial turned very smoothly from 1.5-6 with no binding at all.

The extra lever (or knob, whatever you want to call it) on top of the turrets are locks.  Turn it in the direction indicated and the turrets lock in place, preventing accidental turning of the turrets.

Spinning the turrets seemed nice enough.  The elevation turret was nice and crisp with distinct audible clicks.  Oddly, the windage turret was alittle less pleasing.  Turns felt alittle spongy and the clicks could be felt, but not heard.

After inspecting the scope's exterior, I took it inside to test the reticle illumination.  Konus calls their reticle the 30/30 shown below.

Konus laser etched 30/30 illuminated reticle (illumination turned off).

In the next six pictures you will see both the red and blue dots.  The flaring you see in the picture was not seen with the naked eye, but managed to show up in the photos. The picture was taken inside a well lit living room during daylight hours.


Intensity level:  6

Intensity level: 3

Intensity level:  1

Intensity level:  6

Intensity level:  3

Intensity level:  1

Inside the house or at night, the illumination worked well enough.  However, outside in daylight, the illumination was useless.  If daylight illumination is a must for you, then this scope is out.


I mounted the scope onto my 16" AR15 and took it out to the desert for a day of shooting.  Zeroing wasn't too bad, but after several hours of (not lightly) handling the rifle and firing approximately 400 rounds through it, the zero was definitely off.  Performing a modified box test showed the reticle wasn't tracking properly.  For example, at a 100m I would dial in 8 minutes up, fire, then dial back down 8 minutes.  Theoretically,  I should be at my zero, but I was shooting about two minutes high.  However, in the scope's defense it could have been the rifle, the ammo, or me.

Conclusion:  if you plan on just plinking, this scope might be the ticket.  It offers a tactical look and is totally functional at a relatively low price.  And although the reticle tracking is off a bit, you can always confirm zero before a day of shooting. 

If you need precision reticle tracking, then you might want to consider a scope of higher quality.  As for me, I'll keep looking.